
By Nnanna Otuonye — Founder, AllTitanParts.com | Authorized OEM Dealer | 5250 Gulfton St, Suite 1H, Houston, Texas 77081 | Over 20 Years in the Spray Equipment Industry
The Titan 440 is one of the most widely used airless sprayers in professional painting — and one of the most frequently neglected when it comes to structured annual maintenance. Contractors run these machines hard, flush them at the end of each job when they remember to, and then wonder why the pump fails on the first day of the busy season.
A properly executed annual service takes three to four hours and costs the price of a packing kit plus a few valve components. A machine that doesn’t get that service costs you a half-day breakdown at the worst possible time, plus whatever secondary damage accumulates from operating on worn components. Over twenty years of supplying parts to working contractors, the math on this is not close.
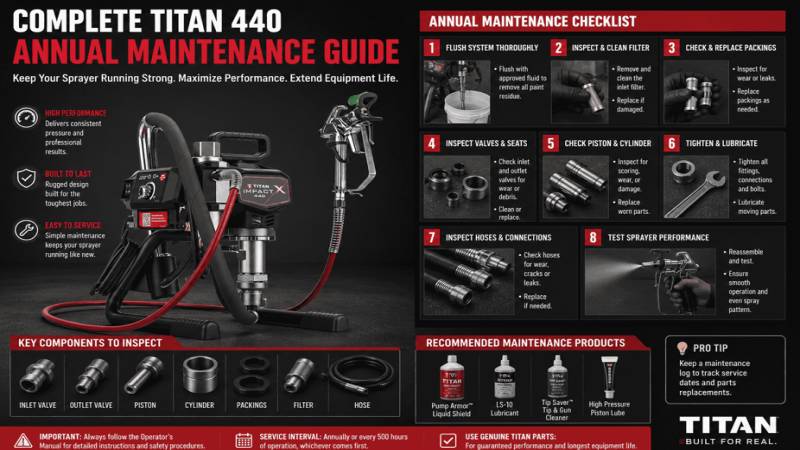
This guide covers every step of a complete annual service for the Titan 440 — what to inspect, what to replace on schedule regardless of visible condition, what to keep on the shelf, and the habits that extend service intervals between annual services.
What You Need Before You Start
Do not begin an annual service without confirmed parts availability. The service will tell you what needs replacing. Going in without anything on the shelf means each problem you find becomes a delay.
Parts to have on hand:
- Repacking kit for your specific 440 model (part number varies between Impact 440, ControlMax 440, etc. — confirm against the parts diagram for your machine)
- Inlet valve assembly
- Outlet valve assembly
- Manifold filter at the correct mesh rating
- Pump armor or throat seal oil
- Appropriate solvent for your typical material
For a machine with significant hours or one that hasn’t been serviced in over a year, also have a piston rod available. Rod inspection early in the service will tell you whether you need it.
All of these components are available through the Titan 440 maintenance parts inventory at AllTitanParts.com. If you’re not sure of the correct part numbers for your specific 440 variant, the parts diagram for your model lists every component by reference number for confirmation before ordering.
Step 1: Flush and Clean the Fluid System
If the machine was stored correctly — with pump armor run through the fluid section — begin by flushing the pump armor out before inspection.
Prime the machine with the appropriate solvent and run it through until the discharge runs clear. Flush with clean solvent one more time. You want clear, uncontaminated fluid at the gun before you disassemble anything.
If the machine was stored with coating material in the system:
This is the most common pre-service situation for machines that weren’t flushed properly after the last job. Dried latex in the fluid section requires soaking with water before any mechanical inspection is useful. Dried oil-based material requires mineral spirits. In severe cases — material that dried and hardened completely — the fluid section may need to soak overnight before the piston will move freely.
This situation is entirely preventable with a thorough end-of-job flush. A fifteen-minute flush before winter storage eliminates two to three hours of soaking and cleaning at the start of the next season.
Step 2: Inspect the Packing and Piston Rod
With the machine flushed and clean, prime it with clean water and run it for two to three minutes at low pressure while observing the wet cup area closely.
Wet cup inspection:
Material in the wet cup before you’ve started the service means the packing was already failing at the end of last season. Clear pump armor or only slight discoloration means the packing may still be serviceable. Any actual coating material — paint, stain, coating of any kind — in the wet cup means you’re doing a repack regardless of how the rod looks.
Piston rod inspection:
With the fluid section off the machine, inspect the piston rod surface before deciding on service scope. Run your fingernail perpendicular to the rod axis along its full length. A healthy rod is completely smooth — your nail glides with no resistance. Any drag, groove, or rough patch means the rod needs replacement alongside the packing.
Installing new packing on a damaged rod is one of the most common and expensive maintenance mistakes in airless sprayer service. The rough rod surface destroys new packing in a fraction of normal service life, meaning you’re back on the bench within weeks doing the same job over. If the rod shows any surface damage, replace it. Piston rods for the 440 are a relatively low-cost component compared to the labor cost of a repeat packing failure.
Step 3: Service the Fluid Section
Inlet Valve Service
Remove the inlet valve from the bottom of the fluid section. Inspect the ball and seat for scoring, pitting, or deformation. Clean with solvent and inspect again in good light.
For a machine with moderate to high annual hours, replace the inlet valve assembly as part of the annual service regardless of what the inspection shows. Early-stage valve wear — the stage where efficiency has declined but no visible damage is present — is not reliably detectable by visual inspection alone. The cost of a replacement valve is minimal compared to the diagnostic time of tracking down subtle performance degradation caused by a valve that looks fine but isn’t sealing correctly.
Outlet Valve Service
Inspect and replace the outlet valve using the same protocol as the inlet. If you’re replacing one valve, replace the other. They wear at similar rates, they require the same disassembly to reach, and there’s no cost-effective argument for replacing one and leaving the other to fail six weeks later.
Packing Replacement
If the wet cup inspection or rod inspection indicated packing wear — replace the packing. If neither showed visible wear but the machine has more than a full season of moderate to heavy use since the last repack, replace it anyway. Annual packing replacement on a heavily used machine is maintenance, not repair.
The packing stack sequence is shown in the diagram that comes with the repacking kit. Follow it precisely — the order matters for sealing correctly. Torque the packing nut to the specified value rather than by feel. Over-tightening the packing nut is the most common assembly error in a fluid section repack and causes accelerated wear on the new packing against the rod.
Step 4: Replace the Manifold Filter
The manifold filter sits between the fluid section outlet and the gun connection. Replace it annually regardless of how it looks. A filter that appears clean from the outside can be partially blocked at the mesh level with fine material that passed through the inlet suction filter during the season.
Use the correct mesh rating for your 440 model. A coarser mesh than specified passes debris to the spray tip. A finer mesh than specified restricts flow and forces the pump to work harder.
Step 5: Inspect the Suction Assembly Completely
Suction hose inspection:
Check the full length of the suction hose for cracks, particularly at the fittings and at any point where the hose is regularly bent or kinked. Flex the hose through its full range of motion while watching for white stress marks that indicate the material is fatiguing. A cracked suction hose introduces air into the fluid path — the symptom is priming failure and inconsistent pressure that looks exactly like a valve problem but isn’t.
Suction strainer:
Clean or replace the suction strainer at the end of the pickup tube. If the strainer mesh is damaged or deformed, replace it.
Fittings:
Check all fittings in the suction path for hand-tightness. Fittings that back off under vibration are a common source of air leaks that produce intermittent priming issues.
Step 6: Inspect the Gun and Spray Tip
The gun and tip aren’t part of the pump service, but an annual inspection covers the full machine.
Check the gun trigger mechanism for smooth action and positive lock engagement. Worn trigger mechanisms allow pressure to build without triggering properly, which puts extra load on the pressure transducer and motor protection system.
Inspect the spray tip for orifice wear. A tip that started at 0.015 inch and has worn to 0.019 inch is consuming approximately 60% more material per pass than the specified rate, requiring higher pressure to compensate and putting extra load on the pump. Replace worn tips. The airless spray tips catalog at AllTitanParts.com covers every orifice size and fan width in Titan HEA and standard reversible configurations.
Step 7: Test Under Pressure Before the First Job of the Season
After completing the service, test the machine fully before the first job. Prime it, bring it to operating pressure, and spray a test pattern on a piece of cardboard or test surface.
Check for:
- Consistent pressure — no pulsing or cycling
- Clean, even fan pattern — no heavy edges, no coarse center atomization
- No leaks at any fitting, the gun connection, or around the wet cup area
- Normal priming time — the machine should build pressure within seconds
A machine that passes this test under controlled conditions is unlikely to surprise you on a job. A machine that goes straight from the annual service to a production day without testing occasionally does.
What to Keep on the Shelf Year-Round
Annual service is scheduled maintenance. But pumps don’t always wait for the annual service — packing fails between services, valves wear faster when running abrasive materials, suction filters need mid-season replacement.
Keeping a basic parts inventory in the shop or the service van means a mid-job failure is a one-hour repair instead of a lost day. At minimum: one repacking kit for your model, one inlet valve assembly, one outlet valve, a spare manifold filter at the correct mesh rating, and a bottle of pump armor.
These are low-cost, small components. The cost of keeping them on hand is trivial. The cost of not having them when the pump goes down mid-job is not.
Nnanna Otuonye is the founder of AllTitanParts.com, an authorized OEM dealer of Titan, SprayTech, Wagner, and Speeflo airless sprayer parts located at 5250 Gulfton St, Suite 1H, Houston, Texas 77081. With over 20 years in the spray equipment industry, he supplies painting contractors and industrial coating professionals across the United States with genuine factory parts and same-day shipping. See more